BlackBerry Venice – An Android Powered Smart Phone [Leaked Images]

BlackBerry is a brand of smart phones and its an oldest brand that work’s to make smart phones. BlackBerry uses’s its own OS (Operating System) called BlackBerry OS. In the earlier days, their OS is got popularity in the world and many peoples had started to use their mobiles. But after coming Android (a Google OS) to the market, the value of BlackBerry OS becomes down and now a days a very few peoples are using BlackBerry mobiles because of its OS.
BlackBerry is also supporting .apk files but not working as Google’s OS works.

Now after BlackBerry Passport and Z3 and Q10, BlackBerry is planning to launch a new mobile powered with Android OS, ofcourse they are providing a very good mobiles with mid-range prices but only because of the OS, they are not get popularity in market. The only drawback is their OS.

What’s new in BlackBerry Venice?

  • A mobiles comes with Android OS.
  • SIM and micro-SD card are places at the top of the mobile.
  • Flipped mobile phone.
  • Have 16MP Main camera.
  • Running Lollipop Version of Android.

Leaked images of Venice:

Quickly identify either the link is dofollow or nofollow

As we all know what hyperlink actually does. Hyperlink is a tag in HTML that combines/ attach pages to the website. The story of hyperlink is not end here, if you are a blogger and you want to see your site on top pages in Google. You must have to create the backlinks of your site on top Page Ranked website or the sites called Web 2.0.
If your website link is found on other top PA websites, Google will appreciate you and increase the ranking or your website.
There are 2 types of backlinks:

1. Dofollow
2. Nofollow

Lets see what is the difference between these two attributes first.

Dofollow vs Nofollow

 These are two different attributes for hyperlink tag. For the normal user it doesn’t matter. But for the blogger or those who are running websites, it’s necessary to know about these tag attributes.

Dofollow

It is an HTML attribute with tells search engine bots to follow the link and appreciate the link. It helps the targeted link to get good ranking in the search engines.
Dofollow backlinks are most powerful backlinks for any website which want to get good ranks in search engine.

Nofollow

Nofollow backlinks are those links that are not followed by search engine bots. It means that if you got a nofollow backlink, your site will not get any changes in ranking in search engine.

Q: How to know either the link is dofollow or nofollow?

If you want to see either the link is dofollow or nofollow, you can simply do inspect element and see the attributes.

But it takes too much time to see the link one by one either it is dofollow or nofollow. Also most of websites authors enables dofollow link in comments, so it is too difficult to see one by one site using inspect element.
Here is the quick way to see either backlink is dofollow or nofollow.

Things that you need:

1. Google Chrome / Firefox
2. Nofollow Extension – For Google Chrome or Nofollow Addon – Fore Firefox

After installing the extension, nofollow links will be highlighted as shown below.

Thanks for reading this article, if you have any question please mention in comments below.

COUPON: Get Udemy Paid Courses for Free (Limited Time Office)

Udemy is the one of the largest site where you find very useful courses on any topic. Many people are earning from Udemy by providing useful courses to their customers. Customers will purchase that courses and learn from their courses.
There is a coupon system also in Udemy, using the coupon you can get in-rolled to many paid courses for free and get benefit from these courses. In this post, you will find many paid courses coupon, using these coupons, you can in-rolled in these paid courses for free.

Coupons links with their Titles:

Find the Wi-Fi password of the network you are connected

Wi-Fi is common in this modern era. Everyone have its own Wi-Fi, if not then they must have shared Wi-Fi netowrk.
Consider a scenario, you are new in your town and one of your friend comes and connect a Wi-Fi on your PC. The password is saved on your system but you can’t able to access it because of windows security.
Today in this post we will learn that how we can access the password of the Wi-Fi network we are connected.

Steps to view saved Wi-Fi Passwords

1. Connect to the network you want to see the password.
2. Open command prompt with admin privileges.

3. In the command prompt type the following command.

netsh wlan show profile name= key=clear

Note: is the name of your Wi-Fi.

4. After hit enter, you will see the details of your Wi-Fi network along with password as shown below.

Thanks for reading my article.
Please give review about this article on comments below.

How to design in Java Swing like a Professional?

Java is a high level programming language and a cross-platform language, you can run a Java application on any system that have JVM (Java Virtual Machine). It is also an open source programming language, you don’t have to purchase any license from the company to develop any application.
In the whole world, more than 80% devices use Java. Even Google’s most popular OS for mobiles “Android” is also on Java.
Today I’m gonna teach you that how you can design an application in Java just as like a professional companies designs their softwares.

NetBeans

It’s an open source and totally free IDE to program Java applications. You can download it for different platforms like Max OS, Macintosh, Linux or Windows. Grab it from the link given below and install it on your system.

Download NetBeans

Extra Softwares that you need:

I am using some extra software as well to design as much better app as I can. You can also download these software or use different softwares as well.

  1. Adobe Photoshop CC – For designing the backgrounds and buttons Icon.
  2. Google Chrome – For downloading Icons and other things.

Starting from NetBeans

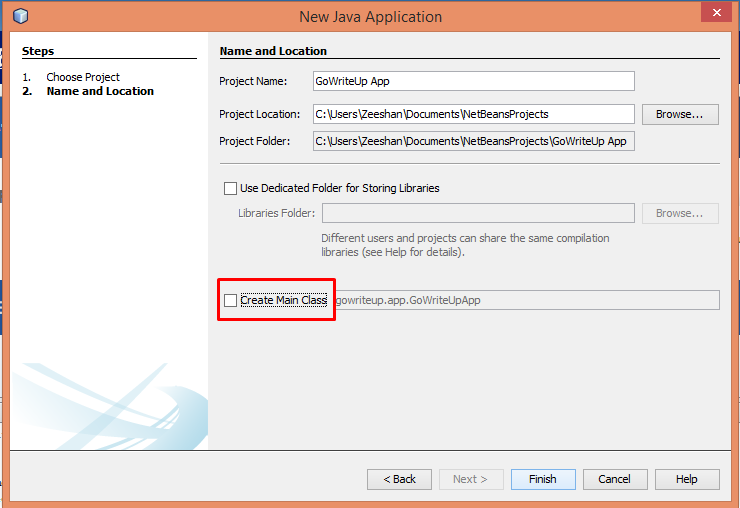
1. After installing NetBeans, Open it and create a new project in Java by selecting “Java Application” and then click on “Next”.

2. In the next window, unmark the “Create Main Class” option.
Reason: We will create a main class using swing.

3. Right click on the project and Create a new JFrame Form with the name “main”.

4. Your project will open with Swing Controls and Swing Containers.
5. Right click on JFrame Form and set the Layout of the Form as Null Layout.

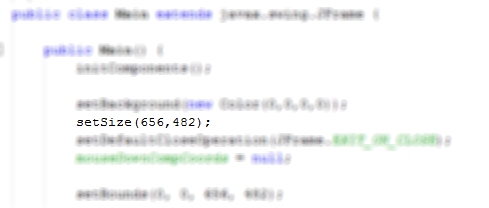
6. When you set the Layout to Null, the size of the Form will be 0,0. You have to set it manually from coding as I defined below.
Go to the code view and the following code below “main” class.

setSize(656,482);

6. Create an Image in Photoshop, just like below. I am designing a sample of SMS Marketing App. I have designed an Image that I will put into the background of Java App.
7. Go back to the NetBeans and open design view of your project. Set the label name to empty and set the Icon to the label.
8. After applying the Icon, my project is just looking like this.
9. It seems just not like a professional, There must not be the Windows Close, Maximize and Minimize buttons.
To remove these button, simply right click on the JFrame Panel and go to the properties and mark the “Undecorated” option.
10. After doing this, the borders and the windows default buttons will be gone and the Application is just looking like this.
11. Now we have to remove the extra silver background from the application. For this, go to the code view and add the below code just below the code you put before.

setBackground(new Color(0,0,0,0));

After adding this code, the background will be fully transparent. Here you got a problem, you can’t able to drag of close your application.

In the next post, will we learn “How we can create the JFrame form drag-able from anywhere?”
Also, we will add the buttons to this application further and make the hover effect into it.
Wait for the next post and drop your comment regarding this post or if you got any problem while creating and applying these steps.

How to signup with Facebook Messenger without Email / Facebook Account?

Starting nowadays, you’ll be able to sign on for Facebook messenger even though you do not have an account with the social network. you do not even want an email address, in fact. Facebook solely needs your 1st and family name, phone number, and a photograph to urge started. “With this update, a lot of individuals will enjoy all the options that are obtainable on messenger — together with photos, videos, group chats, voice and video calling, stickers and a lot of,” the company wrote the company blog post.
Facebook also encourages signing up with Facebook thus users “take advantage of multi-device electronic messaging across mobile devices, the web and tablets.” that means signing in with a name and phone number won’t set your chats across devices.
Facebook says the aim is to succeed in a lot of folks. It’s price noting that whereas making a messenger log-in won’t import contacts, the rest of Messengers services like video chat and stickers remain on the market.

Using messenger while not a connected Facebook account might build it a lot of attractive for businesses likewise. At its F8 conference earlier this year, Facebook debuted messenger Business as a way to induce shoppers and brands or stores chatting. Not let go a Facebook profile might build it a lot of attractive to users, and a business might link any phone number to messenger.

Signup for Facebook Messenger

Signup for Facebook Messenger is just like simple as signup with WhatsApp and other apps. You just simply put your mobile number and verify it with code sent in SMS and get start with Facebook Messenger 😉 .

Source: The Next Web
Source: The Verge

What is Sandbox and How to use it?

A software sandbox is no different that a sandbox built for a child to play. By providing a sandbox to a child we simulate the environment of real play ground (in other words an isolated environment) but with restrictions on what a child can do. Because we don’t want child to get infected or we don’t want him to cause trouble to others. 🙂 What so ever the reason is, we just want to put restrictions on what child can do for Security Reasons.

Now coming to our software sandbox, we let any software(child) to play (execute) but with some restrictions over what it (he) can do. We can feel safe & secure about what the executing software can do.

You’ve seen & used Antivirus software. Right? It is also a kind of sandbox. It puts restrictions on what any program can do. When a malicious activity is detected, it stops and informs user that “this application is trying to access so & so resources. Do want to allow?”.

Download a program named sandboxie and you can get an hands on experience of a sandbox. Using this program you can run any program in controlled environment.

The red arrows indicate changes flowing from a running program into your computer. The box labeled Hard disk (no sandbox) shows changes by a program running normally. The box labeled Hard disk (with sandbox) shows changes by a program running under Sandboxie. The animation illustrates that Sandboxie is able to intercept the changes and isolate them within a sandbox, depicted as a yellow rectangle. It also illustrates that grouping the changes together makes it easy to delete all of them at once.

Now from programmer’s point of view, sandbox is restricting the API that is allowed to the application. In the antivirus example, we are limiting the system call (operating system API).

Another example would be online coding arenas like topcoder. You submit a code (program) but it runs on the server. For the safety of the server, They should limit the level of access of API of the program. In other words, they need to create a sandbox and run your program inside it.

If you have a proper sandox you can even run a virus infected file and stop all the malicious activity of the virus and see for yourself what it is trying to do. In fact, this will be first step of Antivirus researcher.

Download Sandboxie and Run any software Safer.

Source: StakOverFlow

Use 4 Different WhatsApp Accounts in 1 Android Phone or iPhone

WhatsApp Icon


WhatsApp is a mobile app use to communicate with friends and family. It is a most popular app and using almost 200 million users now a days.
WhatsApp account is based on your SIM card number (Mobile Number). So users can use 1 WhatsApp account per mobile. But what if you want to use more than 1 account? Here is the solution, Follow up this post and you can use up to 4 accounts at a time in a single phone.

WhatsFapp


WhatsFapp is an application developed by “Osmdroid” to use more than 1 WhatsApp in a single phone.
WhatsFapp have following features.

Features:

 -AntiBan & Ban Proof
-Full Customization
-Osm Privacy Features . Hide Last Seen, Double Ticks, Blue Ticks, Typing for contacts/groups
-All WhatsApp+ Features (few exceptions)
-Toast when someone goes Online
-New Material Design Base
-Select between Old UI & Calls UI
-Dual WhatsApp+ Reborn in One Android Device
-No need to uninstall original WhatsApp.
-Works on Note 4 , S6 in which WhatsApp is pre installed
-Preview Images & Videos without downloading just like iOS
-Group Stats

Steps to Install WhatsFapp

Step 1: Download the WhatsFapp from the link given below.
Step 2: Install the (.apk) file on your mobile.
Note: For using 4 WhatsApps, you need to install all .apk files along with default WhatsApp.
Enjoy the WhatsApp.

Downloads:

Torrent:

Zippyshare Link for Android:

WhatsFapp with iOS Emojis: http://bit.ly/1FoslCh
WhatsFapp with Twitter Emojis: http://bit.ly/1Fosqpv
WhatsFapp with Google Emojis: http://bit.ly/1Fosrd3

Zippyshare Link for iPhone (iOS)

WhatsFapp with iOS Emojis: http://bit.ly/1FosBRK
WhatsFapp with Twitter Emojis: http://bit.ly/1FosDcp
WhatsFapp with Google Emojis: http://bit.ly/1FosFB5

Mediafire Link for Android

WhatsFapp with iOS Emojis: http://bit.ly/1FosNAp
WhatsFapp with Twitter Emojis: http://bit.ly/1FosPZh
WhatsFapp with Google Emojis: http://bit.ly/1FosOob

Mediafire Link for iPhone (iOS) 

WhatsFapp with iOS Emojis: http://bit.ly/1FosYMj
WhatsFapp with Twitter Emojis: http://bit.ly/1Fot1aW
WhatsFapp with Google Emojis: http://bit.ly/1Fot06A

How to Disable AddThis Tracking Code from URL?

AddThis is a popular widget for almost all platforms to share the content on multiple social networks easily. Many people are using this widget to their website so people can share their posts / contents to their social network profiles like Facebook, Twitter, Google+ etc. Not only can this but you can also track your posts that how many posts are being shared by users and how many posts are shared on which platform.
They are tracking URL’s so they are adding tracking code to each URL. The tracking code is just 11 letters code placed at the end of the URL. Just like an example given below

Many users just don’t want this extra tracking code in URL and many bloggers think that this code is raised from a template error but actually it isn’t. Here is how you can remove this tracking code from all of your URL’s. Follow these instructions.

Steps to Remove Tracking Code:

Step 1: Login to your Blogger account and go to Dashboard.
Step 2: Go to Template > Edit HTML.
Step 3: Find the code smilier to code given below.

You all have done! No tracking code will be added to your website’s URL from now.
Enjoy the blogging 🙂

Don’t forget to give feedback below in comments.

Top 3 Best Android Apps to Block Calls and SMS

Call Blocker Icon

SMS (Short Messaging Service) is become popular day by day and it is the major part of our life. It helps to contact with each other. Mobile service providers gives many packages to send SMS to local and international numbers. But there is some drawbacks of these SMS’s, do you know what they are? Let me tell you how these SMS can disturb your life. Many people / Organizations are sending marketing SMS to many mobile numbers daily to advertise these business also anyone who want to disturb someone, can use these SMS (Sending SMS multiple times) to disturb him. If we are talking about calls, you can block the specific number(s) that they disturb you. Every mobile service provider have this facility. But if we talk about SMS, no one can facilitate you to block from receiving SMS from a specific number. If you are facing this type of problem and you are using an Android Phone then you don’t have to worry about. In this post I am going to show you the best and useful android apps to block unwanted calls and SMS.

Top 3 Best Android Apps to Block Calls and SMS

1. Text Blocker – Postman

It is a free android app to block unwanted SMS. This app will automatically detect the spam messages and block them and store them to Spam folder. You can check the spam messages and also you can transfer if back to your phone’s inbox. This is one of the best android app to block Spam SMS.

2. SMS Filter

This is another app to block Spam SMS’s and calls. You just put the number by selecting from Phonebook using this app to prevent from receiving SMS from that number. This is the easiest app to block any number.

 3. Backlist Plus – Call Blocker

This is the best app in my opinion, this app have some advanced features like Blocking Modes, Backlist Scheduling and much more. You can set the time period to block calls and SMS on that time. Also you can block calls from Private numbers.